Anchor Management
Once your anchor application has been approved, you manage your anchor from the My Anchors card on your RIPE Atlas dashboard. The card shows the state of each anchor you host, tells you what step is needed next, and is where you submit change requests to the RIPE NCC.
This page explains how to read the card and how to use the anchor change request form.
Finding the My Anchors card
Log in to your RIPE NCC Access account and go to the dashboard. The My Anchors card only appears if your account is registered as an anchor host, so if you cannot see it, check that you are logged in with the account your anchor application was made from.
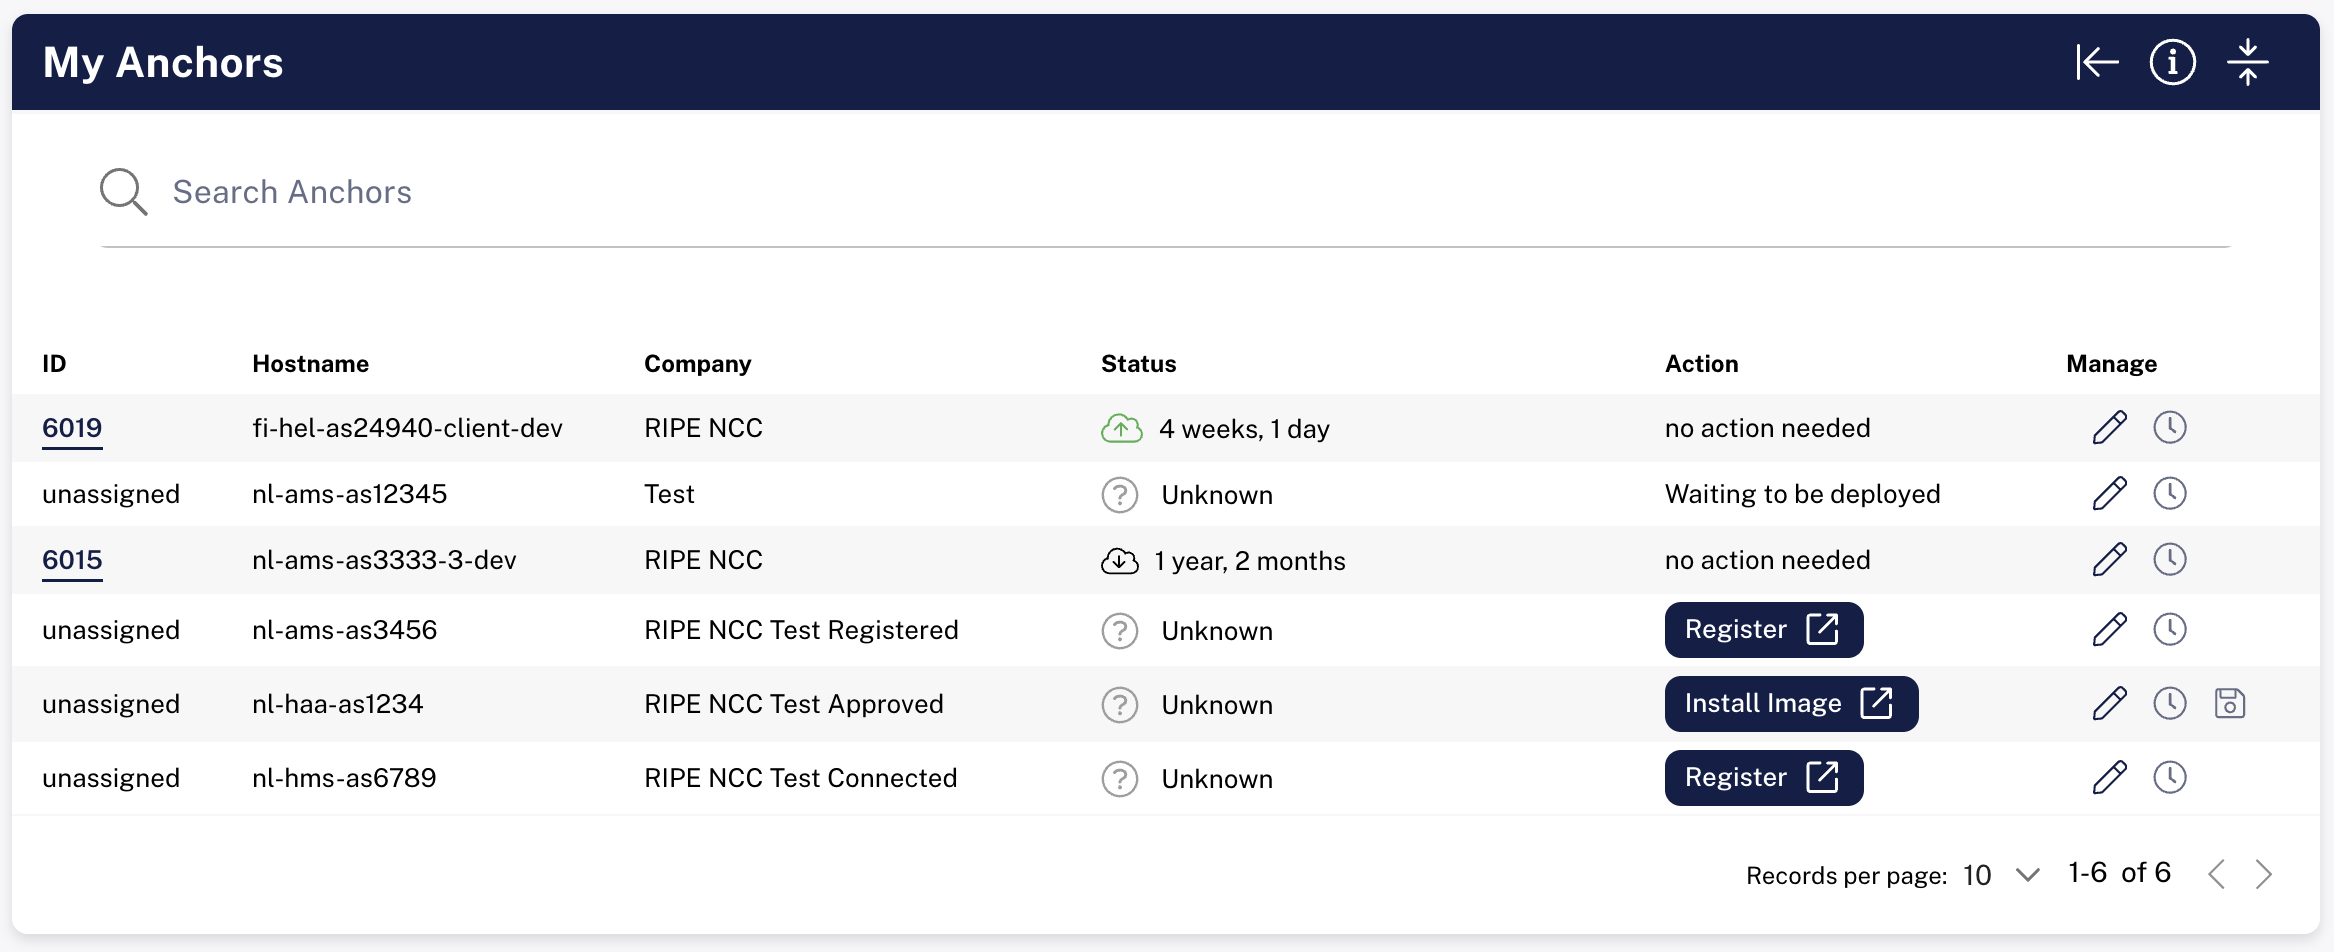
If you host many anchors, use the Search Anchors field at the top of the card to filter the list.
Reading your anchor list
Each row in the card is one anchor:
| Column | What it shows |
|---|---|
| ID | The probe ID of the anchor, linking to its probe page. Shows unassigned until a probe ID has been allocated. |
| Hostname | The anchor's hostname, automatically generated in the form countrycode-citycode-asxxxxx. |
| Company | The organisation hosting the anchor. |
| Status | The anchor's connection status, with how long it has been in that state. |
| Action | The next step needed from you, if any. See Knowing what to do next. |
| Manage | Buttons to make a change request, view request history and download the anchor image. |
The Status column
The Status column shows an icon for the anchor's current state, followed by how long it has been in that state — for example 2 weeks, 3 days. The name of the status is not written out next to the icon, so hover over the icon to see it.
| Icon | Status | Meaning |
|---|---|---|
| Green cloud with an up arrow | Connected | The anchor is connected and reporting to RIPE Atlas. This is the normal, healthy state. |
| Red cloud with a down arrow | Disconnected | The anchor was connected before but is not reporting right now. |
| Black cloud with a down arrow | Abandoned | The anchor has been disconnected for an extended period. |
| Black wastebasket | Written Off | The anchor has been permanently removed from the network. |
| Orange warning triangle | Never Connected | The anchor has never reported to RIPE Atlas. Expected while you are still installing it. |
| Grey question mark | Unknown | No status is available for this anchor yet. |
The elapsed time counts from the moment the anchor entered its current state, and is shown in the largest two units that apply — hours, days, weeks, months or years. Two states are exceptions: Never Connected and Unknown have no such moment to count from, so they show their name as text instead of a time.
If your anchor is unexpectedly Disconnected, see Troubleshooting Probe Status — the same connectivity checks apply to anchors.
Knowing what to do next
The Action column is the spine of the anchor setup process. It always shows the one thing that is needed next, so you can work through a new anchor by repeatedly doing whatever it asks. When nothing is left to do, it says so.
| What the Action column shows | What it means | What to do |
|---|---|---|
| Register (button) | The anchor's IP addresses have not been registered yet. | Click it and complete the Register IP addresses form. |
| Install Image (button) | Registration is done and your anchor image is ready. | Click it to download the image, install it, then confirm. See Installing the image. |
| Mark connected (button) | The software is installed and the RIPE NCC is waiting for you to confirm the anchor is on the network. | Connect the anchor, then click the button to confirm. |
| Awaiting hostname approval | The RIPE NCC is checking the generated hostname. | Nothing — wait. |
| Waiting to be deployed | The anchor is connected and the RIPE NCC is running its internal verification tests. | Nothing — wait. The RIPE NCC will contact you if anything fails. |
| no action needed | The anchor is connected and deployed. | Nothing. The anchor is fully active. |
Installing the image
Clicking Install Image opens the Install image for RIPE Atlas anchor dialog, which gives you the download links for your anchor:
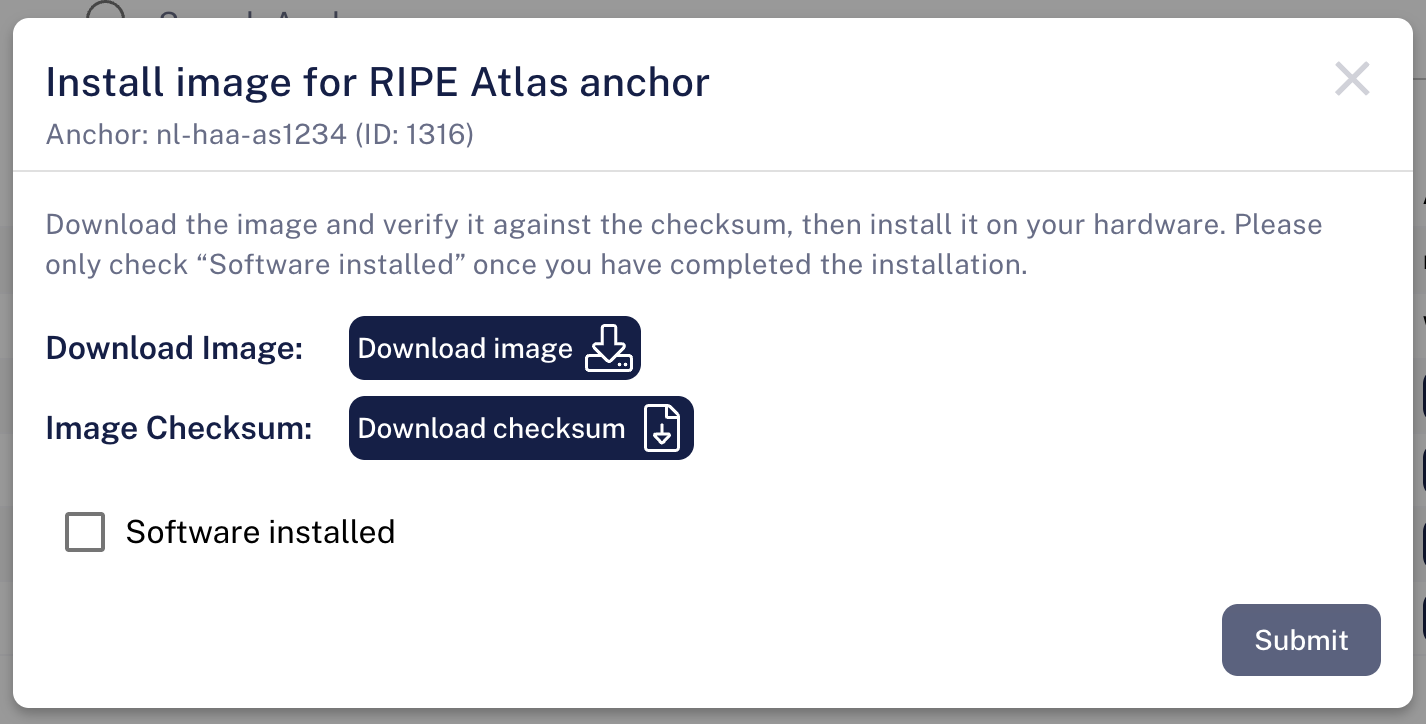
- Click Download image to get the ISO installer.
- Click Download checksum and verify the ISO against it.
- Install the image on your hardware or virtual machine, following Installing an Anchor.
- Only once the installation is finished, tick Software installed and click Submit.
If the buttons show Not available, the image is not ready for your anchor yet. The same links are also offered by the Download image button in the Manage column, for as long as an image exists for the anchor.
The Manage column
Every row has up to three buttons:
| Button | Tooltip | What it does |
|---|---|---|
| Pencil | Manage | Opens the change request form with the full list of request types. |
| Clock | Change request history | Shows every change request you have made for this anchor and its status. |
| Disk | Download image | Opens a menu with Download image and Download checksum file. Only shown while an image exists for the anchor. |
Making a change request
Anything you need the RIPE NCC to change about your anchor goes through the change request form. Click the pencil (Manage) button on the anchor's row to open it.
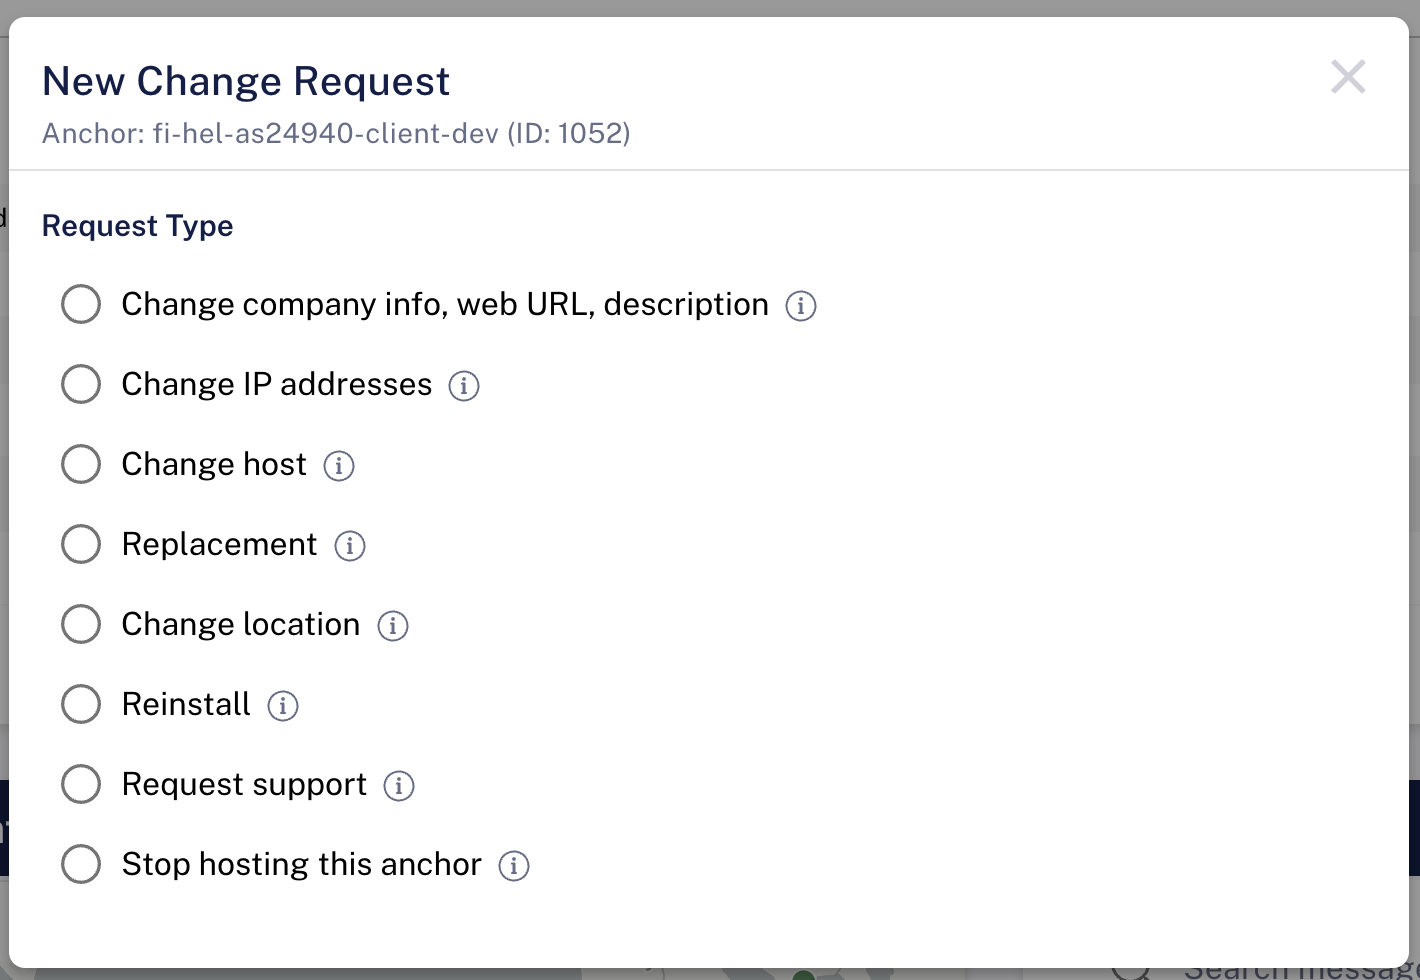
Pick a Request Type first — the form then shows only the fields that request needs. Each type has an info icon next to it explaining what it does.
| Request type | Use it to | Approval |
|---|---|---|
| Change company info, web URL, description | Update your company name, website URL, or the anchor's public description. | RIPE NCC |
| Change IP addresses | Change the anchor's IPv4 and/or IPv6 addresses, gateways and netmask/prefix. | RIPE NCC |
| Change host | Change the host contacts for the anchor — the primary, secondary and/or LIR host. | RIPE NCC |
| Replacement | Request a replacement anchor, for example if the hardware has failed. | RIPE NCC |
| Change location | Move the anchor to a new physical location. | RIPE NCC |
| Reinstall | Reinstall the anchor keeping the same hostname and IP addresses. | Automatic |
| Request support | Send a general support question about this anchor. | Creates a ticket |
| Stop hosting this anchor | Remove the anchor from RIPE Atlas entirely. | RIPE NCC |
Every request type also has a Notes field. It is optional for most types, but required for Request support (as Message) and Stop hosting this anchor (as Reason). Use it to give the RIPE NCC any context that does not fit the other fields.
When you are ready, click Submit Request. If you try to close the form with unsaved changes, you will be asked to confirm.
Change company info, web URL, description
The form has three fields: Company, Web URL and Description. Company and Description are prefilled with the anchor's current values. Web URL is the website your logo links to, not the logo image itself. Change the values you want updated and leave the rest as they are — you only need to fill in one field for the request to be valid.
WARNING
Anchor descriptions are public. Avoid personal identifiers, contact details, offensive language, or anything infringing someone else's intellectual property.
Register or change IP addresses
The same form covers registering your addresses for the first time and changing them later. It is titled Register IP Addresses when you reach it from the Register action and Change IP Addresses when you open it from the Manage button.
The ASN and Hostname are shown for reference and cannot be edited. You then fill in:
- IPv4: IPv4 Address, IPv4 Gateway, IPv4 Netmask
- IPv6: IPv6 Address, IPv6 Gateway, IPv6 Prefix
Complete all three fields of a family or leave all three empty — a half-filled family is rejected with the message "Complete all three IPv4 fields or leave them all empty". At least one family must be complete. Anchors need both IPv4 and IPv6 under normal circumstances, so fill in both unless the RIPE NCC has agreed otherwise with you.
Change host
Use this to change who is registered as the host of the anchor. There are three contact roles, each identified by an email address:
- Primary host email: the main contact for the anchor.
- Secondary host email: an additional contact.
- LIR host email: the contact at the LIR responsible for the anchor.
Fill in at least one field. The email you provide either adds a new contact for that role or replaces the existing one, and any field you leave blank is left unchanged. Each address you do fill in has to be a valid email address, otherwise the field shows "Enter a valid email address" and the request cannot be submitted.
The addresses are not prefilled, so the form does not show you who the current contacts are — you only enter the ones you want changed.
Host changes are reviewed by the RIPE NCC.
Replacement
Use this if the anchor hardware has failed or otherwise needs replacing. You supply the location, ASN, whether the replacement is Hardware or a Virtual Machine, and its IP addresses. At minimum an IPv4 address is required.
Set the location with the map: search for an address or drag the marker, and the Location field is filled in from the pin. You can edit it afterwards if the derived address is not quite right.
Replacement requests are reviewed by the RIPE NCC.
Change location
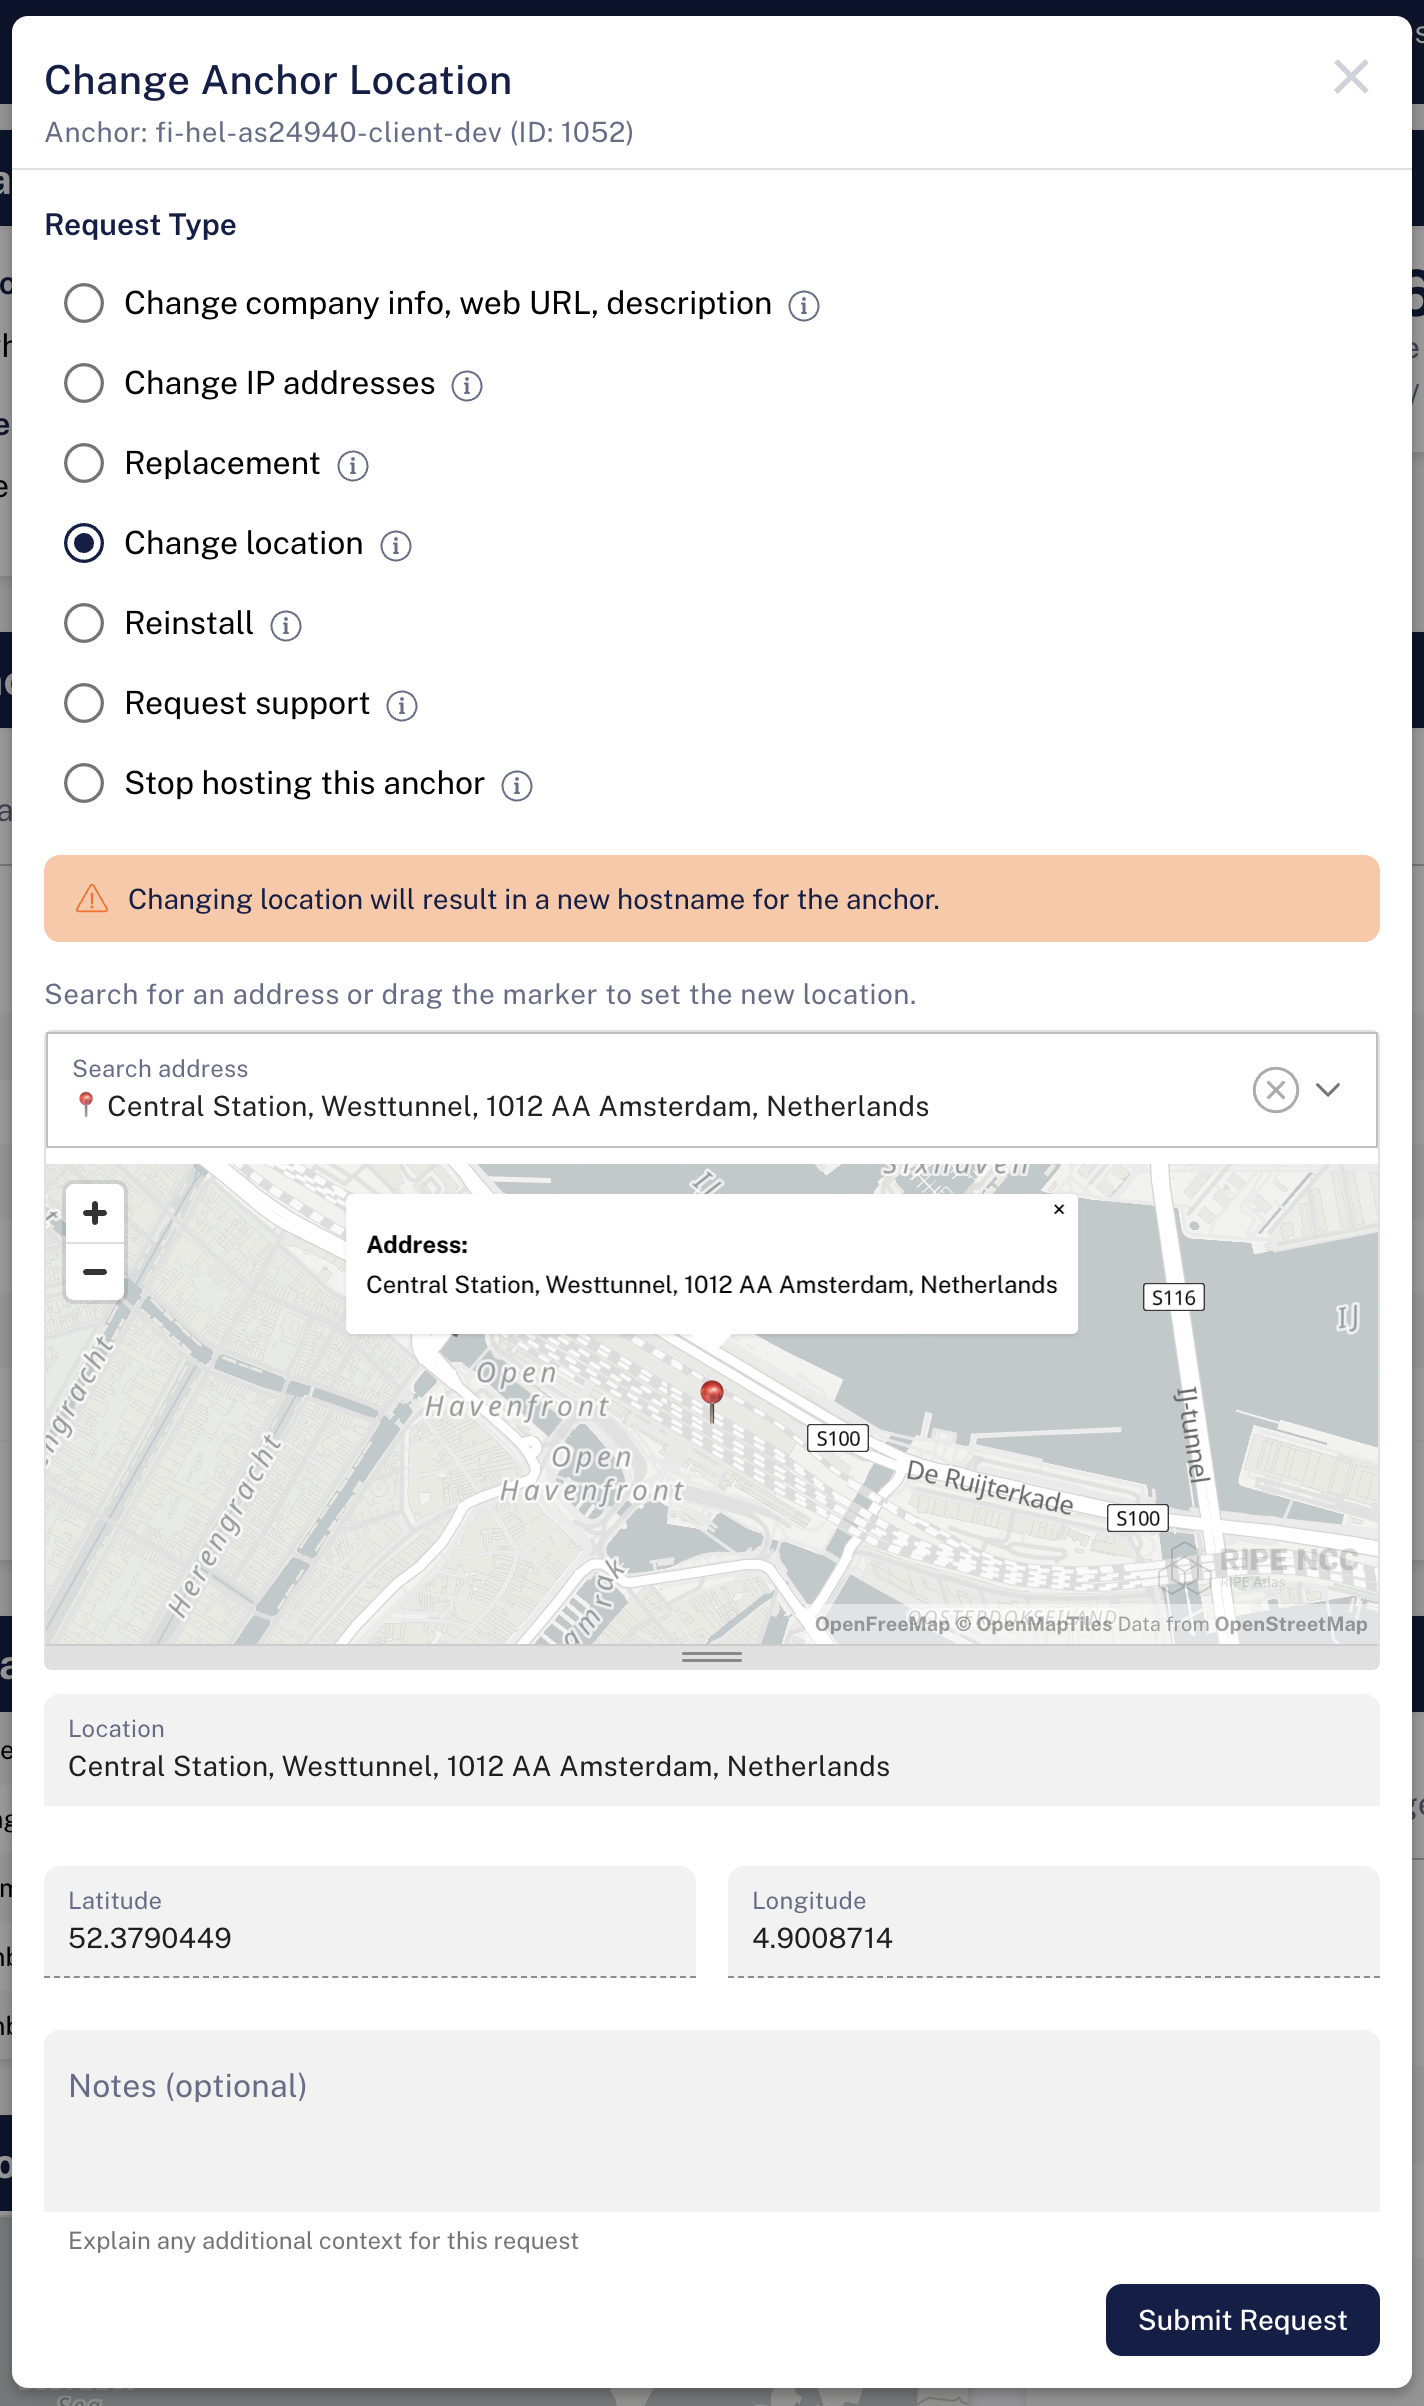
Search for an address or drag the marker to set the new location. Latitude and Longitude update from the pin and are read-only.
WARNING
Changing the location results in a new hostname for the anchor, because the hostname encodes the country and city. Anything referring to the old hostname will need updating.
Reinstall
Reinstall keeps the same hostname and the same IP addresses, so it is the right choice when you need to rebuild the anchor in place rather than move or replace it. You must confirm both:
- The hostname will remain the same (location is not changing)
- IP addresses and gateways will remain the same
Reinstall requests are auto-approved by the system rather than reviewed by a person. The anchor needs to be disconnected before the request can actually be processed, but you can submit it while the anchor is still connected.
Request support
For anything not covered by the other types. Fill in a Subject and describe the problem in the Message field. The RIPE NCC creates a support ticket and follows up with you.
Stop hosting this anchor
Tick I want to stop hosting this anchor and give a Reason. This removes the anchor from the RIPE Atlas network and requires RIPE NCC approval.
Tracking your requests
The clock button on the anchor's row opens Change Request History, listing every request you have made for that anchor, most recent first, with the date, your notes and the current status.
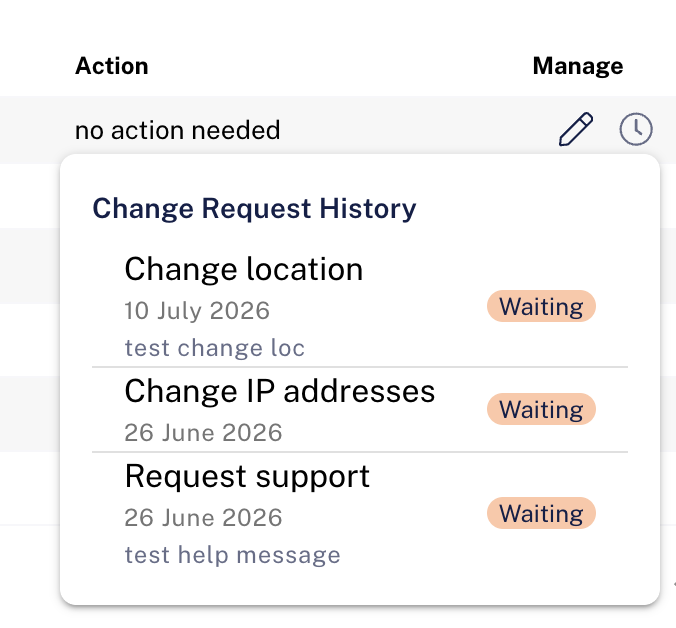
| Status | Meaning |
|---|---|
| Waiting | Submitted and waiting for the RIPE NCC to look at it. |
| Approved | Accepted and being carried out. |
| Done | Completed. |
| Denied | Not accepted. Check the RIPE NCC's follow-up, or submit a support request if the reason is unclear. |
Requests you make from the Action column — registering, marking connected and image downloads — appear here too, so the history is a complete record of the anchor's setup.